(918) 694-1483
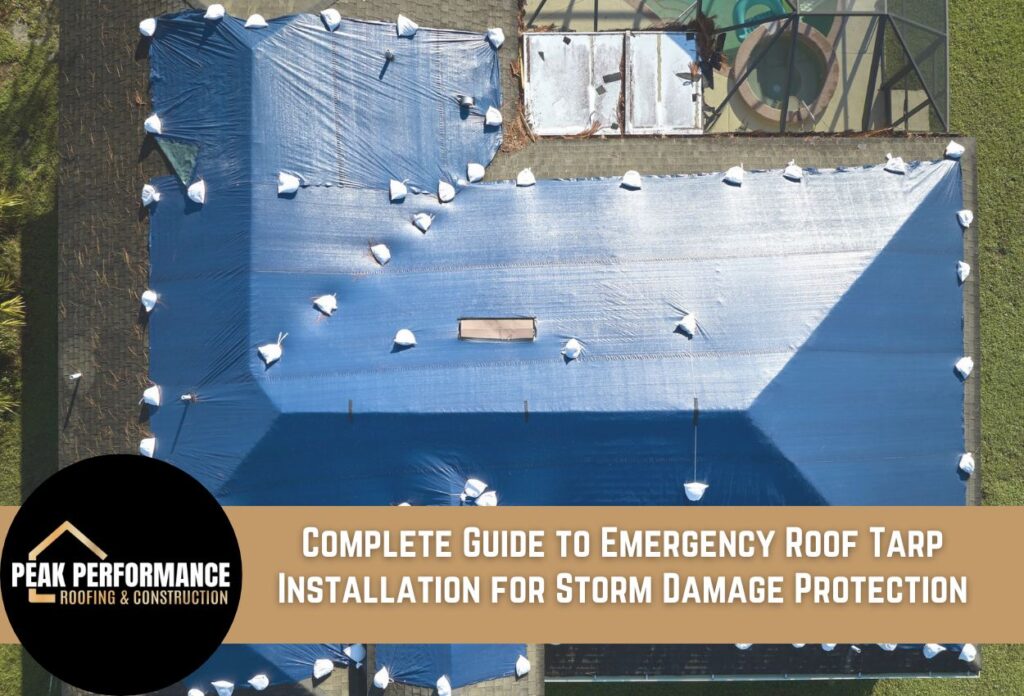
Storm damage can transform a secure roof into a vulnerable entry point for water, debris, and the elements within minutes. When severe weather strikes and leaves holes, missing shingles, or damaged sections in your roof, immediate action becomes essential to prevent catastrophic damage to your home’s interior. Emergency roof tarping provides important temporary protection that can save thousands of dollars in additional damage while you wait for professional repairs.
Understanding how to install a roof tarp properly makes the difference between effective emergency roof repair and inadequate protection that fails when you need it most. The temporary roof covering process requires specific materials, proper techniques, and safety considerations to create a weatherproof barrier over damaged areas. Storm damage roof repair often begins with this crucial first step that buys valuable time for permanent repairs.
Roof leak protection through proper tarp installation involves more than simply throwing a tarp over the damaged area. The process requires strategic placement, secure fastening, and appropriate roof tarp materials that can withstand wind, rain, and temperature fluctuations.
Essential Materials and Tools Required for Proper Roof Tarp Installation
Successful emergency roof repair begins with gathering the right roof tarp materials before attempting the installation of a temporary roof cover. Heavy-duty polyethylene tarps rated for outdoor use provide the best coverage for effective roof leak protection, with thickness measurements of at least 6-mil recommended for roof applications. These tarps must extend beyond the damaged area by 3 to 4 feet to ensure complete coverage and proper water runoff.
Fastening materials form the backbone of secure tarp installation, requiring galvanized roofing nails, heavy-duty staples, or specialized tarp screws with washers to prevent tearing. 2×4 lumber boards help create anchor points along the tarp’s edges, distributing weight and preventing wind uplift during severe weather. Additionally, rope or bungee cords can provide an additional securing option for areas where direct fastening isn’t possible or isn’t safe to do.
Safety equipment represents the most important component when learning how to install a roof tarp effectively. Extension ladders with proper weight ratings and stabilizing feet ensure safe roof access, while safety harnesses and non-slip footwear prevent dangerous falls during emergencies. Work gloves protect your hands from sharp debris and rough materials, while safety glasses shield your eyes from wind-blown particles during the installation process. Having these materials readily available enables a quick response when storm damage occurs, minimizing leaks and protecting your property value.
Critical Safety Precautions Before Accessing Your Damaged Roof
Assessing structural integrity becomes the most important step before attempting any roof tarp installation on storm-damaged areas. Walking on compromised roofing materials poses severe risks of collapse or injury, making careful inspection from ground level essential before accessing elevated areas. Damaged rafters and roof decking, or missing structural supports, create hidden dangers that may not be immediately visible from below but can fail under additional weight.
Visual inspection techniques help identify unsafe conditions before beginning emergency roof repair work. Look for sagging areas, exposed or broken rafters, and sections where roofing materials have completely separated from underlying structures. Roof decks that have become soaked from leaks lose a significant amount of their load-bearing strength and may appear solid while actually being ready to collapse. These compromised areas require professional evaluation before any temporary roof covering installation should be attempted.
Weather directly impacts the safety and effectiveness of roof tarp materials. High winds exceeding 25 mph create dangerous working conditions and prevent proper tarp deployment, while wet or icy surfaces make falls almost inevitable. Oklahoma weather patterns can change rapidly, making timing crucial for a successful tarp installation. Active storm systems, lightning, or approaching severe weather require postponing the installation until conditions improve. Even light rain creates slippery surfaces that dramatically increase accident risks during emergency roof repair attempts. Waiting for appropriate weather windows ensures both personal safety and proper storm damage roof repair execution that will withstand subsequent weather.
Roof Tarp Installation Process for Maximum Protection
Proper measurement and positioning are the basis of an effective roof tarp installation that provides reliable roof leak protection during emergencies. Begin by measuring the damaged area from ground level using binoculars or by carefully assessing safe roof sections to determine tarp size requirements. The emergency roof repair covering must extend at least 4 feet beyond all damaged edges to ensure complete water runoff and prevent water from getting in around the temporary covering’s edges.
Positioning the tarp correctly requires starting at the highest point of the roof and working downward to create proper drainage patterns. Unfold the roof tarp materials gradually while ensuring the waterproof side faces upward, and smooth out any wrinkles that could collect standing water. The tarp should overlap undamaged shingles by several rows to create runoff that prevents water from working underneath the temporary covering and entering the damaged area during heavy or wind-driven rainfall.
Advanced fastening techniques create windproof anchoring systems that secure the tarp without causing additional structural damage to already compromised roofing systems. Place 2×4 lumber strips along all tarp edges and secure them through the tarp into a solid roof deck using galvanized nails spaced every 12 inches. This sandwich method distributes stress across wider areas and prevents tearing during high winds that are common in our area’s severe weather.
Rope systems provide additional security by creating tie-down points that anchor the tarp to stable roof features or ground-level anchors. Thread the rope through reinforced grommets and secure it to the base of your chimney, vent stacks, or temporary ground anchors driven into stable soil. This multi-point anchoring system ensures storm damage roof repair protection remains intact even during additional bad weather while permanent repairs are arranged.
Common Installation Mistakes That Compromise Roof Leak Protection
Important positioning errors during emergency roof repairs can create vulnerable points where leaks occur despite tarp coverage. Many homeowners place roof tarp materials without considering proper drainage patterns, resulting in water pooling that eventually seeps through fastener holes or overwhelms tarp edges. Insufficient coverage represents another frequent mistake where the temporary roof covering fails to extend far enough beyond damaged areas, allowing wind-driven rain to get underneath the tarp’s edges.
Positioning the slope improperly causes water to either flow towards damaged areas, making the issue worse, or to parts of the covering with no drainage. This creates additional stress on compromised roof structures. When tarps are installed without adequate overlap onto undamaged shingles, water follows the path of least resistance directly into the home’s interior. These positioning errors often occur when installers rush the process or fail to account for Oklahoma’s intense storm patterns that drive precipitation at steep angles.
Fastening failures are the most common reason why emergency tarps fail during additional bad weather. Over-tightening fasteners through roof tarp materials causes immediate tearing around attachment points, while under-secured tarps allow wind to create lifting forces that eventually pull the entire covering loose. Using incorrect fastener types or spacing them too far apart creates weak points where wind forces concentrate and cause catastrophic failure.
Attachment problems frequently develop when fasteners are installed into damaged roof decking that lacks adequate holding power. Without proper backing boards or reinforcement strips, fasteners pull through both tarp material and weakened roof structures during high winds. These mechanical failures leave homes completely exposed to leaks, often causing more damage than the original storm that caused the need for the tarp’s installation.
Maintaining Your Temporary Roof Cover Until Professional Repairs Can Be Made
Regular inspection schedules become essential for maintaining effective roof leak protection while waiting for professional repairs. Weekly visual inspections from the ground level help identify potential problems before they compromise the temporary roof covering system. Check for loose edges, torn sections, or areas where roof tarp materials have shifted due to wind or thermal expansion.
Daily (or weekly if the weather has not been bad) hands-on inspections require careful roof access to examine fastener integrity and tarp condition more thoroughly. Look for pulled nails, stretched grommets, or areas where the emergency roof repair covering has developed stress tears around attachment points. These detailed assessments help predict when replacement or reinforcement becomes necessary. Document any changes with photographs to track deterioration patterns over time.
Warning signs that need immediate attention include water stains appearing on interior ceilings despite tarp coverage, indicating leaks around edges or through compromised areas. Flapping sounds during windy conditions suggest loose sections that require additional fastening before the wind causes complete detachment. Visible sagging areas often indicate water pooling that stresses both tarp material and underlying roof structures beyond safe limits.
Professional intervention becomes necessary when multiple fasteners fail, large tears develop, or when interior water damage continues despite having an intact tarp. Roof repair contractors possess specialized equipment and materials for reinforcing temporary coverings that exceed typical homeowner capabilities. These situations require immediate professional assessment to prevent catastrophic failure during the next storm.
When to Transition from Temporary Tarping to a Professional Roof Repair
Emergency roof repair tarps provide essential short-term protection, but understanding their limitations prevents homeowners from relying too heavily on temporary solutions. Most roof tarp materials begin deteriorating within 30 to 90 days of installation, depending on weather exposure and installation quality. UV radiation breaks down plastic fibers, while temperature fluctuations cause expansion and contraction that loosen fasteners and create stress points around attachment areas.
Structural concerns escalate when a temporary roof covering remains in place beyond recommended timeframes. Leaks around tarp edges gradually weaken the roof deck, while trapped moisture creates ideal conditions for mold growth and wood rot. These hidden damages add up over time and significantly increase repair costs compared to quick professional intervention. Oklahoma’s climate extremes accelerate the deterioration process, making extended tarp coverage problematic.
Professional repair scheduling should begin immediately after an emergency tarp installation, not when the temporary cover fails. Roofing contractors have waiting lists during peak storm seasons, so making early contact is important for securing a repair timeframe quickly. Obtaining multiple estimates while storm damage roof repair protection remains intact can help in your decision-making process without pressure from failing temporary systems.
You should also get in touch with your insurance company, documenting every change and fix as you await permanent repairs. Proper documentation typically includes photographing both the original damage and the installed tarp system before weathering occurs. Maintain records of installation dates, materials used, and any maintenance performed during the waiting period, and any costs associated with these repairs. Professional contractors can provide proper damage assessments that support insurance claims.
Secure Your Roof with Expert Tarp Installation from Peak Performance Roofing & Construction
If you’re facing urgent storm damage and need immediate roof leak protection, don’t hesitate to secure your Tulsa home with a professional tarp installation. At Peak Performance Roofing & Construction, we understand the important nature of fast, effective emergency roof repair. Delaying can make repair costs go up and could lead to further damage in the future.
Don’t risk improper installation and further damage by tackling this alone. Call us today at (918) 694-1483 and let our professionals handle your emergency roof tarp needs efficiently and safely.